
Coming from conda#
If you manage environments with conda create, conda activate, and
environment.yml files, this guide shows how conda-workspaces brings
workspace environments, lockfiles, and tasks to the workflow you
already know.
What stays the same#
conda-workspaces is a conda plugin that uses conda’s configured solver
backend, channels, and package infrastructure. Your .condarc settings,
channel configuration, and package cache all carry
over. Environments are real conda prefixes you can inspect with
conda list.
What changes#
Traditional conda |
conda-workspaces |
|---|---|
Environments live in a global location |
Environments live in |
One environment per |
Multiple environments from a single manifest |
No lockfile (or separate conda-lock) |
|
No built-in task runner |
|
|
|
Share |
Share |
Command mapping#
conda |
conda-workspaces |
|---|---|
|
|
|
|
|
|
|
|
|
|
|
|
|
|
|
|
|
|
Migrating an environment.yml#
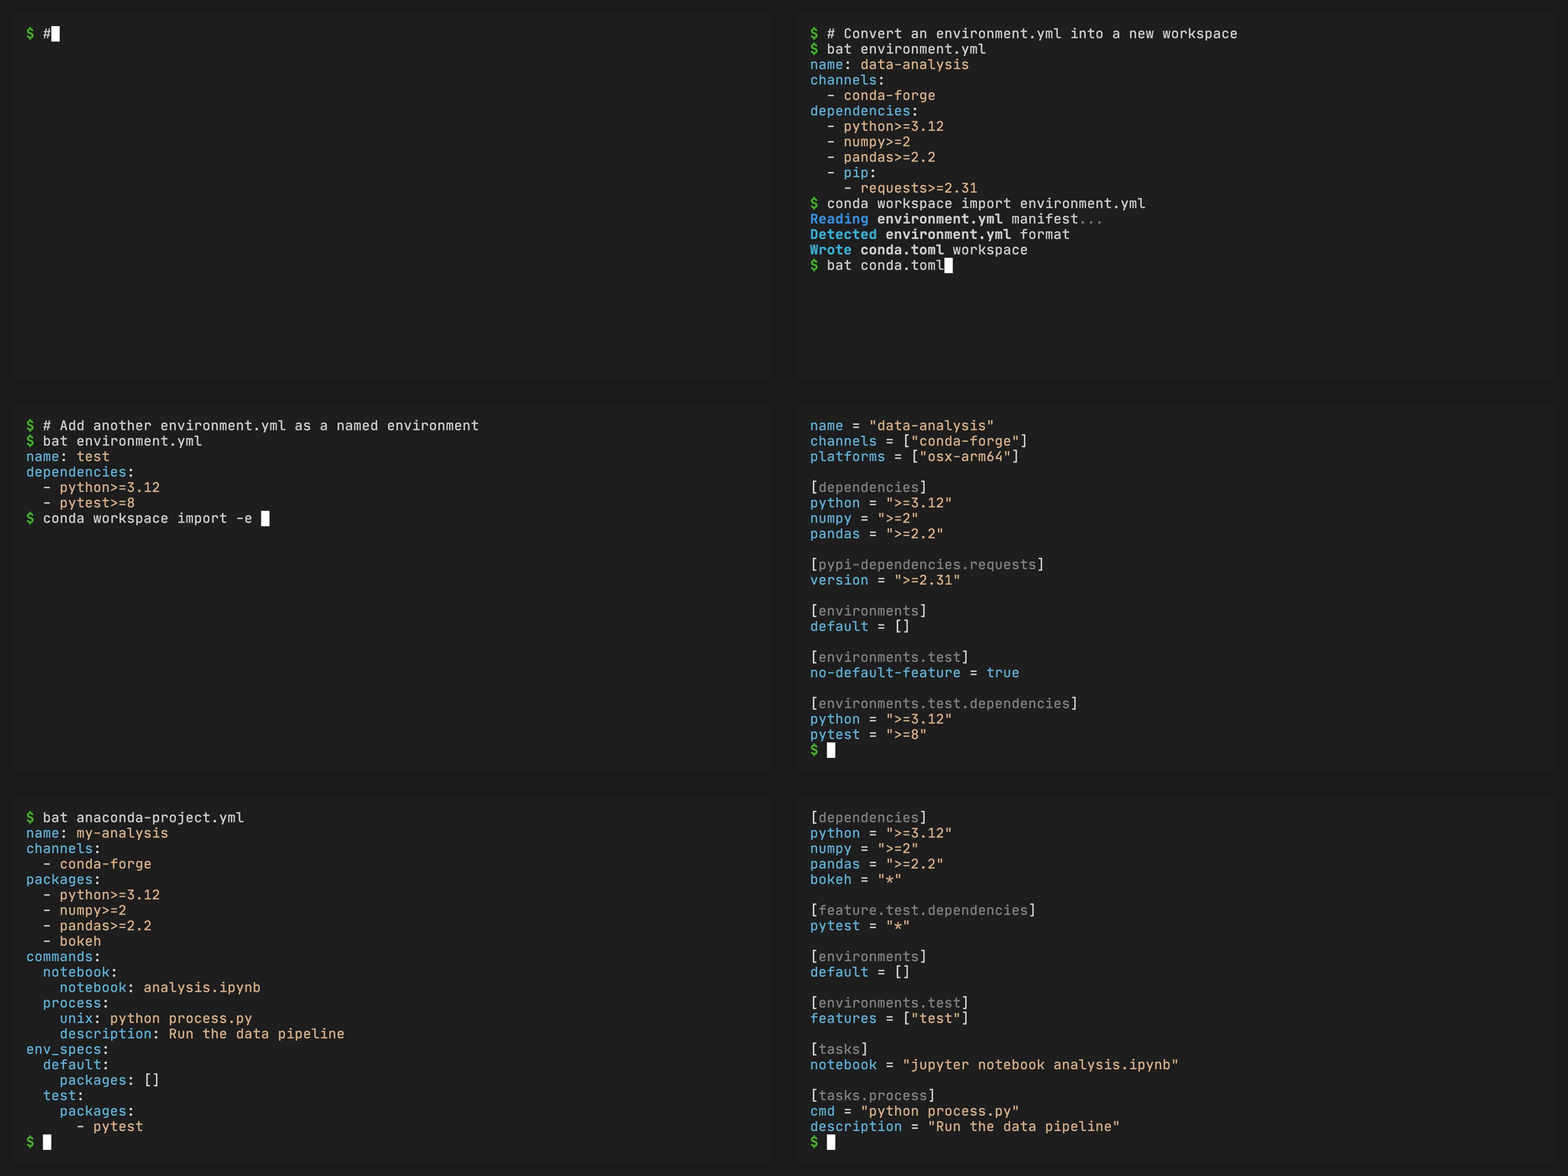
Create a workspace from environment.yml#
To create a workspace from one environment.yml, run the import command
without -e/--environment:
conda workspace import environment.yml
This reads your environment.yml and writes a conda.toml with the
equivalent workspace configuration. Use --dry-run to preview the
output without writing a file, or -o custom.toml to choose a
different output path. This form converts the complete source manifest. It
does not merge with an existing workspace, update conda.lock, or install an
environment. The global --file option is not accepted in this mode.
The importer preserves representable conda channel, build, subdir, hash, and
credential-free direct URL fields, along with PyPI extras. It rejects embedded
credentials in direct package sources, PyPI direct URLs, and environment
markers instead of silently changing their meaning. Keep PyPI direct sources
in the source manifest until the importer can represent them losslessly.
Replace platform markers with
[target.<platform>.pypi-dependencies] declarations when applicable.
For reference, given an existing environment.yml:
name: my-project
channels:
  - conda-forge
dependencies:
  - python>=3.10
  - numpy>=1.24
  - pandas>=2.0
  - pip:
    - requests>=2.31
On a linux-64 machine, the equivalent conda.toml is:
[workspace]
name = "my-project"
channels = ["conda-forge"]
platforms = ["linux-64"]

[dependencies]
python = ">=3.10"
numpy = ">=1.24"
pandas = ">=2.0"

[pypi-dependencies]
requests = ">=2.31"
Then install:
conda workspace install
Add environment.yml to an existing workspace#
To add a complete environment.yml as a new named workspace environment, pass
the target name with -e/--environment:
conda workspace import -e data environment.yml
The command adds private conda dependencies under
[environments.data.dependencies] and private PyPI dependencies under
[environments.data.pypi-dependencies]. The environment does not inherit the
workspace’s default dependencies. The command-line name is authoritative, so
a different name: in the YAML does not rename the workspace environment.
The target name must be new and cannot be default.
Named import accepts only environment.yml and environment.yaml. To select
an exact target manifest, put the global --file option before import:
conda workspace --file path/to/pixi.toml import -e data environment.yml
If the YAML omits channels or platforms, the imported environment uses the
workspace values. If it declares channels, they must match the workspace
channels in the same credential-safe normalized order. Declared platforms
must match the workspace’s declared platform names. Channels, platforms,
channel priority, and rich-platform requirements remain workspace settings.
The nodefaults channel marker cannot be represented by a named workspace
environment and must be removed before import.
A YAML prefix: is ignored with a warning because workspace environments live
under .conda/envs/. Named import rejects variables: and unknown top-level
keys instead of dropping configuration it cannot represent.
By default, named import refreshes the complete lockfile and installs the new environment. Use these options to control that lifecycle:
Option |
Result |
|---|---|
No lifecycle option |
Update the manifest and complete lockfile, then install the new environment |
|
Update the manifest and complete lockfile without changing a prefix |
|
Update only the manifest |
|
Replace an existing inactive target prefix after validation |
|
Parse, validate, and solve without writing the manifest, lockfile, or prefix |
An existing target prefix requires --force-reinstall. The active prefix
cannot be replaced. --force-reinstall cannot be combined with --no-install
or --no-lockfile-update.
Lockfiles: reproducibility built in#
Traditional conda has no built-in lockfile. You might use conda env export to capture a snapshot, but the output is platform-specific and
re-solving from it can produce different results over time.
conda-workspaces generates a conda.lock file automatically when you
run conda workspace install or conda workspace lock. The lockfile
records exact package URLs and checksums for every environment and
platform in your workspace:
conda workspace lock                   # solve only, write conda.lock
conda workspace install                # solve, lock, and install
conda workspace install --locked       # install from lockfile (validates freshness)
conda workspace install --frozen       # install from lockfile (skip freshness check)
--locked checks that the lockfile matches your manifest. If you’ve
changed dependencies since the lockfile was generated, the install
fails and tells you to re-lock. --frozen skips that check and
installs exactly what’s in the lockfile, which is useful in CI where
you want zero solver overhead.
Commit conda.lock to version control and every contributor, CI
runner, and deployment target gets identical environments.
Works with conda env create#
conda-workspaces registers environment spec plugins so that standard conda commands understand workspace manifests and lockfiles directly:
conda env create --file conda.toml -n myenv    # solve and create from manifest
conda env create --file conda.lock -n myenv    # install exact lockfile contents
Anyone with conda-workspaces installed can use a shared conda.toml
or conda.lock to create an environment with conda env create.
The conda.lock loader used by conda env create rejects external package
references because that interface cannot carry their verified artifacts into
conda’s installer. Declare external dependencies in conda.toml, regenerate
conda.lock, then use conda workspace install.
The companion conda-lockfiles
plugin (installed as a dependency) adds the same conda env create
support for pixi.lock and conda-lock.yml files:
Plugin |
Files |
Format |
|---|---|---|
conda-workspaces |
|
workspace manifest |
conda-workspaces |
|
rattler-lock-derived, |
conda-lockfiles |
|
rattler-lock v6 |
conda-lockfiles |
|
conda-lock v1 |
Multiple environments from one manifest#
With traditional conda you create separate environments and manage them individually. conda-workspaces lets you define composable features in a single file:
[workspace]
name = "my-project"
channels = ["conda-forge"]
platforms = ["linux-64", "osx-arm64"]

[dependencies]
python = ">=3.10"
numpy = ">=1.24"

[feature.test.dependencies]
pytest = ">=8.0"

[feature.docs.dependencies]
sphinx = ">=7.0"

[environments]
default = []
test = { features = ["test"] }
docs = { features = ["docs"] }
One conda workspace install creates all three environments, each
with its declared dependencies. The test environment includes
everything in default plus pytest.
Adding tasks#
Traditional conda has no task runner, so most projects use Makefiles, shell scripts, or tox. conda-workspaces has tasks built in:
[tasks]
test = { cmd = "pytest tests/ -v", depends-on = ["lint"] }
lint = "ruff check src/"

[tasks.check]
depends-on = ["test", "lint"]
description = "Run all checks"
conda task run -e test check    # resolves dependency order automatically
conda task list                 # shows all available tasks
Tasks support dependency graphs, input/output caching, Jinja2 templates, and per-platform overrides. See features for details.
Workspace environments#
Traditional conda stores environments globally (typically under
~/miniconda3/envs/). conda-workspaces stores them under the workspace
root:
my-project/
├── conda.toml
├── conda.lock
└── .conda/envs/
    ├── default/
    ├── test/
    └── docs/
Each workspace has its own environments. Different workspaces can have different versions of the same packages without conflicting.
Next steps#
Your first workspace for a full walkthrough with environments and tasks
Configuration for all manifest fields and file formats
CI pipeline for using conda-workspaces in GitHub Actions